
DIY crystal manicure guide: practical steps to create professional shining manicure at home
Crystal manicure has become the first choice for many manicure enthusiasts because of its durability and crystal clear effect. Want to easily complete professional-level crystal manicure at home? Mastering the correct tool preparation and operation steps is the key to achieving the manicure effect. This article will introduce the process and skills of DIY crystal manicure in detail to help you create shining fingertips.
I. Tools and materials required for crystal manicure
1. Grinding rod
Used to trim the length and shape of nails, the commonly used degrees are 150G, 180G and 240G, the higher the degree, the finer the surface.
2. Balancer and fixative
Balancer adjusts the pH value of the nail surface and removes moisture and grease; fixative enhances the adhesion between real nails and crystal powder.
3. Nail mask
Used to extend the length of nails, with scales for easy length control
4. Crystal powder and crystal powder solvent
Crystal powder is divided into transparent, natural, pure white and pink, and needs to be used with solvent to form a crystal layer.
5. Crystal nail shaping stick and crystal mink pen
The shaping stick helps to shape the curvature of the nail, and the mink pen is used to dip crystal powder and solvent for precise operation.
6. Polishing stick and anti-UV polish
The polishing stick is used to polish the surface of the nail to make it smooth and shiny; the anti-UV polish protects the color of the nail and prevents it from turning yellow.
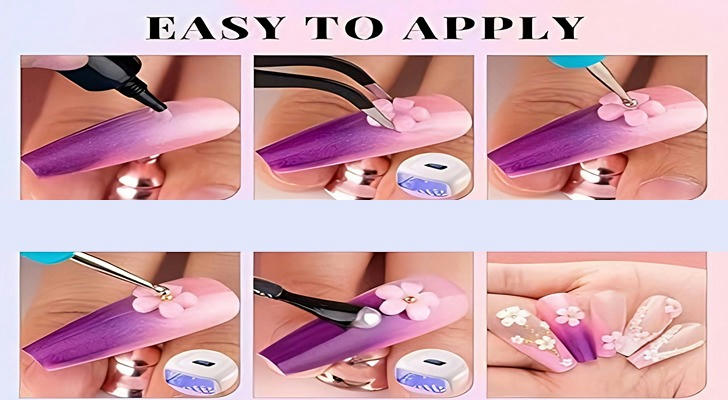
II. Detailed explanation of DIY crystal manicure steps
1.Nail preparation
Use the grinding stick to trim the length and shape of the nail, smooth the nail surface, and clean the nail surface.
2.Apply balance agent and fixative
Apply the balance agent evenly to keep the nail surface dry; then apply the fixative to enhance adhesion.
3.Apply the nail mask
Choose a nail mask of appropriate length according to your needs, close to the front end of the nail, and prepare to extend the nail.
4.Mix crystal powder and solvent
Use a crystal mink brush to dip in solvent first, then dip in an appropriate amount of crystal powder to mix into a crystal ball suitable for operation.
5.Shaping and applying crystal layer
Apply the prepared crystal ball evenly on the nail film, use the shaping stick to shape the natural curvature, and ensure that there are no bubbles.
6.Wait for the crystal to solidify
Keep the nail still and wait for the crystal to harden naturally to complete the basic crystal layer.
7.Trimming and polishing
After tearing off the nail film, use a grinding stick to trim the shape and surface of the nail and remove excess crystal powder.
8.Polishing and applying polish
Use a polishing stick to polish the surface of the nail to make it smooth and shiny, and finally apply anti-UV polish to protect the nail effect.
III. DIY crystal nail art precautions
1.Operation environment
Keep the operation environment clean to avoid dust and impurities affecting the quality of the nail art.
2.Material dosage control
The ratio of crystal powder to solvent is moderate to avoid the crystal layer being too thick or too thin, which affects the beauty and durability.
3.Protect real nails
Avoid excessive wear of real nails during operation to keep nails healthy.
4.Safety protection
Pay attention to ventilation when using solvents to avoid inhaling too much chemical odor.
IV. Maintenance and removal suggestions
1.Daily care
Avoid hitting hard objects directly with nails to reduce damage to the crystal layer.
2.Regular reinforcement
Reinforce every 2-3 weeks according to the growth of nails to keep the nails intact.
3.Professional removal
It is recommended to go to a professional nail salon for crystal nail removal to avoid damaging the real nail.
V. Summary
Mastering the correct tool preparation and operation steps is the key to the success of DIY crystal nails. Through systematic learning and repeated practice, you can easily create professional-grade crystal nails at home and show your shining charm. Reasonable maintenance and regular reinforcement can extend the life of nail art.
By mastering the above steps and techniques, you can confidently complete crystal nail art at home and enjoy the self-improvement and beauty experience brought by professional-level nail art.